

 You like my animated header, eh? Here's an easy step by step tutorial on how to put one in your blogger blog.
First, we need two images.
 The first image is the Wording part of your header, like what I have above. You can make one using Photoshop, or Paint that comes with your computer. If you want to add drop shadow in Paint, here's a good tutorial on how to do it.
The second image you need is the animated gif of your choice. There are many free to download images on the internet, like the one I have here.
One thing to note is that the total width of your two images should not exceed the width of your template's body wrapper, if you want to keep the header about the same width of the original header.
Upload the two images to your picasa album (it comes with a blogger account), or to any free image hosting site, like image shack and host any pic. One thing I have noticed though, that the animation sometimes doesn't work when the gif image is uploaded to picasa.

The blogger template that I use in this tutorial is Minima and this is how it looks like before I put any clickable image in the header.
Some editing of the template code is required and make sure you follow the instructions closely.
*Click on each of the images below to view larger images.*
 Click on the Layout tab, and choose Edit HTML. On that page, check the Expand widget Template box. Then look for the section that says #header-wrapper. Once you have found that, change 660px to 680px. This is to add to the width which is usually taken up by the borders.
This is how it should look like once you have changed the width.
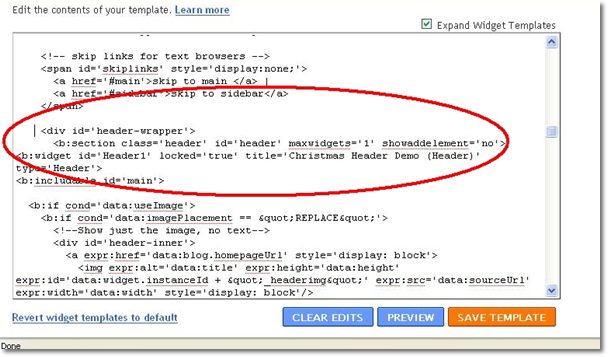
Scroll a little more and look for the section that says div id='header-wrapper'. Change the maxwidgets to '2', and put 'yes' to showaddelement, and change locked='true' to locked="false".
 This is how it should look like when you have made the changes. Click SAVE Template at the bottom right before you move away from the Edit HTML page.
Next, go back to Layout and click on the Page Elements tab. Click on the Edit on the Header widget.
 We want to remove this header and replace it with a clickable header with an image. So click Remove.
Click Ok when the dialog box
 You no longer see the Header widget but you do see Add a Gadget. Click on that.
 A gadget dialog box pops up, and choose HTML/Javascript.
 When the HTML/Javascript dialog box pops up, copy the following code (from image) into the box. CHANGE, the link url to the location url of your uploaded images. Also change the title to the title of your blog. Click Save, when you are done.
 This is what you see instead of Header, once you have added the clickable header code. Click View Blog to see the changes you have made.
 This is how the header looks like now. If you see that the two images are not exactly side by side, then you need to EITHER add to the width of the header wrapper, OR reduce the width size of the "wording" image. That means you need to re-upload that image to which you have made changes, and re-do the new link of the image in the clickable header gadget.
 If you do not like to see the border in the header, all you need to do is change the color of the border and choose a color that blends with your background, in this example the color is white. Don't forget to SAVE every time you make changes!
 Here's how the header looks like when the color of the border has been changed to white. It is not visible anymore.
If you have uploaded your images to your picasa album, this is how to get the link of the images you need. Click on the Link to This Photo on the right column first. You see two sets of links .. look at the lower one. Select the Size .. you want the original size, NOT the thumbnail. Then Check/Tick the Image Only (no link) box. Copy the url/link in Embed Image box. That is the link you want to paste onto your Header code.
For now, enjoy your new animated Christmas Header!
No comments:
Post a Comment